DaRK Development And Research Kit 3.0 Scraper Crawler Preview Webmaster Utilities

Stand Alone Flask Application

Stand Alone Flask Application Template By K0NxT3D

The Stand Alone Flask Application Template is a minimal yet powerful starting point for creating Flask-based web UI applications. Developed by K0NxT3D, this template is designed to run a Flask app that can be deployed easily on a local machine. It features an embedded HTML template with Bootstrap CSS for responsive design, the Oswald font for style, and a simple yet effective shutdown mechanism. Here’s a detailed look at how it works and how you can use it.


Stand Alone Flask Application – Key Features

  1. Basic Flask Setup
    The template leverages Flask, a lightweight Python web framework, to build a minimal web application. The app is configured to run on port 26001, with versioning details and a friendly app name displayed in the user interface.
  2. Embedded HTML Template
    The HTML template is embedded directly within the Flask application code using render_template_string(). This ensures that the application is fully self-contained and does not require external HTML files.
  3. Bootstrap Integration
    The application uses Bootstrap 5 for responsive UI components, ensuring that the application adapts to different screen sizes. Key elements like buttons, form controls, and navigation are styled with Bootstrap’s predefined classes.
  4. Oswald Font
    The Oswald font is embedded via Google Fonts, giving the application a modern, clean look. This font is applied globally to the body and header elements.
  5. Shutdown Logic
    One of the standout features is the built-in shutdown mechanism, allowing the Flask server to be stopped safely. The /exit route is specifically designed to gracefully shut down the server, with a redirect and a JavaScript timeout to ensure the application closes cleanly.
  6. Automatic Browser Launch
    When the application is started, the script automatically opens the default web browser to the local Flask URL. This is done by the open_browser() function, which runs in a separate thread to avoid blocking the main Flask server.

How The Stand Alone Flask Application Works

1. Application Setup

The core setup includes the following elements:

TITLE = "Flask Template"
VERSION = '1.0.0'
APPNAME = f"{TITLE} {VERSION}"
PORT = 26001
app = Flask(TITLE)

This sets the title, version, and application name, which are used throughout the app’s user interface. The PORT is set to 26001 and can be adjusted as necessary.

2. Main Route (/)

The main route (/) renders the HTML page, displaying the app title, version, and a button to exit the application:

@app.route('/', methods=['GET', 'POST'])
def index():
return render_template_string(TEMPLATE, appname=APPNAME, title=TITLE, version=VERSION)

This route serves the home page with an HTML template that includes Bootstrap styling and the Oswald font.

3. Shutdown Route (/exit)

The /exit route allows the server to shut down gracefully. It checks that the request is coming from localhost (to avoid unauthorized shutdowns) and uses JavaScript to redirect to an exit page, which informs the user that the application has been terminated.

@app.route('/exit', methods=['GET'])
def exit_app():
if request.remote_addr != '127.0.0.1':
return "Forbidden", 403
Timer(1, os._exit, args=[0]).start() # Shutdown Server
return render_template_string(html_content, appname=APPNAME, title=TITLE, version=VERSION)

This section includes a timer that schedules the server’s termination after 1 second, allowing the browser to process the redirect.

4. HTML Template

The embedded HTML template includes:

  • Responsive Design: Using Bootstrap, the layout adapts to different devices.
  • App Title and Version: Dynamically displayed in the header.
  • Exit Button: Allows users to gracefully shut down the application.
<header>
<span class="AppTitle" id="title">{{title}} {{version}}</span>
</header>

This structure creates a clean, visually appealing user interface, with all styling contained within the app itself.

5. Automatic Browser Launch

The following function ensures that the web browser opens automatically when the Flask app is launched:

def open_browser():
webbrowser.open(f"http://127.0.0.1:{PORT}")

This function is executed in a separate thread to avoid blocking the Flask server from starting.


How to Use the Template

  1. Install Dependencies:
    Ensure that your requirements.txt includes the following:

    Flask==2.0.3

    Install the dependencies with pip install -r requirements.txt.

  2. Run the Application:
    Start the Flask application by running the script:

    python app.py

    This will launch the server, open the browser to the local URL (http://127.0.0.1:26001), and serve the application.

  3. Exit the Application:
    You can shut down the application by clicking the “Exit Application” button, which triggers the shutdown route (/exit).

Why Use This Template?

This template is ideal for developers looking for a simple and straightforward Flask application to use as a base for a web UI. It’s particularly useful for local or single-user applications where quick setup and ease of use are essential. The built-in shutdown functionality and automatic browser launch make it even more convenient for developers and testers.

Additionally, the use of Bootstrap ensures that the UI will look good across all devices without requiring complex CSS work, making it a great starting point for any project that needs a web interface.


The Stand Alone Flask Application Template by K0NxT3D is an efficient and versatile starting point for building simple Flask applications. Its integrated features, including automatic browser launching, shutdown capabilities, and embedded Bootstrap UI, make it a powerful tool for developers looking to create standalone web applications with minimal setup.

Seaverns Web Development Coding Security Applications and Software Development Bex Severus Galleries Digital Art & Photography

Apache LAMP Install Script

Apache LAMP Install Script

Here’s a full Apache LAMP Install Script for setting up aa LAMP stack on Ubuntu (assuming Linux is excluded from the setup), including the installation and configuration of Apache, PHP, MySQL, and phpMyAdmin. The script also includes basic Apache configurations, enabling modules like mod_rewrite, and configuring phpMyAdmin with secure settings.

Full Apache LAMP Install Script
(for Ubuntu-based systems):


#!/bin/bash

# Update and upgrade the system
sudo apt update -y
sudo apt upgrade -y

# Add PPA for PHP and Apache
echo "Adding PPA repositories for PHP and Apache..."
sudo add-apt-repository ppa:ondrej/php -y
sudo add-apt-repository ppa:ondrej/apache2 -y
sudo apt update -y

# Install Apache2
echo "Installing Apache2..."
sudo apt install apache2 -y

# Install PHP and commonly used extensions
echo "Installing PHP and extensions..."
sudo apt install php libapache2-mod-php php-cli php-mysql php-curl php-gd php-xml php-mbstring php-zip php-soap -y

# Install MySQL Server and secure the installation
echo "Installing MySQL Server..."
sudo apt install mysql-server -y

# Run MySQL Secure Installation
echo "Securing MySQL installation..."
sudo mysql_secure_installation

# Install phpMyAdmin
echo "Installing phpMyAdmin..."
sudo apt install phpmyadmin php-mbstring php-zip php-gd php-json php-curl -y

# Link phpMyAdmin to Apache web directory
echo "Configuring phpMyAdmin..."
sudo ln -s /usr/share/phpmyadmin /var/www/html/phpmyadmin

# Set permissions for phpMyAdmin
echo "Setting permissions for phpMyAdmin..."
sudo chown -R www-data:www-data /usr/share/phpmyadmin
sudo chmod -R 755 /usr/share/phpmyadmin

# Enable Apache modules
echo "Enabling Apache modules..."
sudo a2enmod rewrite
sudo a2enmod headers
sudo a2enmod ssl

# Set up basic Apache configurations (security headers, etc.)
echo "Configuring Apache settings..."
echo '
<IfModule mod_headers.c>
Header always set X-Content-Type-Options "nosniff"
Header always set X-XSS-Protection "1; mode=block"
Header always set X-Frame-Options "SAMEORIGIN"
Header always set Referrer-Policy "no-referrer"
</IfModule>

<IfModule mod_rewrite.c>
RewriteEngine On
RewriteCond %{REQUEST_FILENAME} !-f
RewriteCond %{REQUEST_FILENAME} !-d
RewriteRule ^(.+)$ /index.php [QSA,L]
</IfModule>
' | sudo tee /etc/apache2/conf-available/security_headers.conf > /dev/null

# Enable custom security headers configuration
sudo a2enconf security_headers

# Enable and restart Apache and MySQL services
echo "Restarting Apache and MySQL..."
sudo systemctl restart apache2
sudo systemctl restart mysql

# Set MySQL to start on boot
echo "Ensuring MySQL starts on boot..."
sudo systemctl enable mysql

# Test Apache and MySQL installation
echo "Testing Apache and MySQL..."
sudo systemctl status apache2
sudo systemctl status mysql

# Configure phpMyAdmin with MySQL (Optional, run if needed)
echo "Configuring phpMyAdmin to work with MySQL..."
# Create a user for phpMyAdmin in MySQL
sudo mysql -u root -p -e "CREATE USER 'phpmyadmin'@'localhost' IDENTIFIED BY 'phpmyadminpassword';"
sudo mysql -u root -p -e "GRANT ALL PRIVILEGES ON *.* TO 'phpmyadmin'@'localhost' WITH GRANT OPTION; FLUSH PRIVILEGES;"

echo "LAMP stack installation complete!"


Breakdown of the Apache LAMP Install Script:

  1. System Updates:
    • Updates the package list and upgrades the system to ensure it is up-to-date.
  2. PPA for PHP and Apache:
    • Adds the PPA repositories for the latest PHP and Apache versions (ppa:ondrej/php and ppa:ondrej/apache2).
  3. Apache2 Installation:
    • Installs the Apache web server.
  4. PHP Installation:
    • Installs PHP along with some common PHP extensions (like MySQL, CURL, GD, MBString, XML, and SOAP).
  5. MySQL Installation and Security Setup:
    • Installs MySQL and runs the mysql_secure_installation script to secure the MySQL installation (you’ll need to set a root password and answer security questions).
  6. phpMyAdmin Installation:
    • Installs phpMyAdmin and relevant PHP extensions. It then configures it to be accessible via the Apache web server.
  7. Enabling Apache Modules:
    • Enables the mod_rewrite, mod_headers, and mod_ssl modules for security and functionality.
  8. Apache Basic Configuration:
    • Sets up HTTP security headers and enables the mod_rewrite rule to handle URL rewriting in Apache.
  9. Restart Services:
    • Restarts Apache and MySQL services to apply changes.
  10. Test:
    • Verifies that Apache and MySQL services are running properly.
  11. MySQL User for phpMyAdmin (Optional):
    • Creates a user for phpMyAdmin in MySQL with the necessary privileges. You can customize the password and user details.

Additional Notes:

  • MySQL Secure Installation: This script will invoke the mysql_secure_installation command during execution. You will be prompted to configure your MySQL root password and set other security options interactively.
  • phpMyAdmin: By default, phpMyAdmin will be accessible at http://your-server-ip/phpmyadmin after running this script. Make sure to adjust any security settings (e.g., .htaccess protection) for production environments.
  • Permissions: The script ensures that phpMyAdmin has proper file permissions to function correctly under the web server’s user (www-data).
Linux Apache MySQL Php LAMP Server

MySQL

What is MySQL?

MySQL is an open-source relational database management system (RDBMS) that is widely used for managing and organizing data in a structured manner. Developed and maintained by Oracle Corporation, MySQL uses Structured Query Language (SQL) to handle database tasks such as data retrieval, insertion, updating, and deletion.

What It’s Used For

MySQL is versatile and can be used in a variety of contexts:

  1. Web Applications: It’s commonly used in conjunction with PHP and Apache in the LAMP (Linux, Apache, MySQL, PHP/Perl/Python) stack for developing web applications.
  2. Data Storage: It stores data in a tabular format, which is suitable for applications requiring structured data storage, such as CRM systems, e-commerce sites, and content management systems (CMS).
  3. Analytics and Reporting: Businesses use MySQL to store and query large datasets, performing operations like complex joins, aggregations, and reporting.
  4. Application Development: Developers use MySQL for backend databases in applications due to its reliability and performance.
  5. Business Applications: It supports enterprise-level applications and ERP systems by managing large volumes of transactional data.

Institutions That Use MySQL

MySQL is used by a wide range of institutions:

  1. Tech Companies: Many tech giants and startups use MySQL, including Facebook, Twitter, and Google, for various internal systems and services.
  2. Educational Institutions: Universities and research organizations use MySQL for managing research data, student records, and educational content.
  3. Financial Institutions: Banks and financial services use MySQL for transactional data, customer management, and compliance-related applications.
  4. Government Agencies: Government departments use MySQL for managing public records, administrative data, and service delivery systems.
  5. Healthcare: Hospitals and clinics use MySQL for patient records, appointment scheduling, and medical data management.

Security and Vulnerabilities

Security:

  1. Access Control: MySQL supports user authentication and permissions, allowing administrators to control who can access or modify data.
  2. Encryption: It offers data-at-rest and data-in-transit encryption options to protect sensitive information.
  3. Audit Logging: It can log queries and changes to monitor and detect suspicious activity.
  4. Security Updates: Regular updates and patches are released to address security vulnerabilities.

Vulnerabilities:

  1. SQL Injection: Like other SQL-based systems, MySQL can be vulnerable to SQL injection attacks if applications do not properly sanitize user input.
  2. Misconfigurations: Incorrectly configured MySQL installations can lead to security issues, such as unauthorized data access.
  3. Outdated Versions: Running outdated versions without the latest security patches can expose the database to known vulnerabilities.
  4. Backup Security: If not properly secured, backup files can be a target for data breaches.

Resources

Here are some useful resources for learning more about MySQL:

  1. MySQL Official Website – The main site for downloads, documentation, and product information.
  2. MySQL Documentation – Comprehensive documentation covering installation, configuration, and usage.
  3. MySQL Tutorial – A resource for learning MySQL through tutorials and examples.
  4. MySQL Forums – A place to ask questions and engage with the MySQL community.
  5. MySQL Security Best Practices – Guidelines and recommendations for securing MySQL installations.

This overview should give you a solid understanding of MySQL, its uses, and its security aspects.

Senya 1.0 Cross Domain WordPress Data Mining Utility

Сеня 1.0 (Senya 1.0)

Senya 1.0 Cross Domain WordPress Data Mining Utility

Сеня 1.0 – K0NxT3D 2024
Back End WordPress Utility

Features:

  • Edit WordPress Database.
  • Edit WordPress User Tables.
  • Edit WordPress User Information.
  • Display WordPress Domain and Associated Admin Email Addresses Across Multiple Domains.

A simple and easy to use PHP/HTML Based MySQL Back End Connection Utility with Editing Capabilities and Email Harvesting across Multiple Domains.

Download

Cybercriminals Weaponizing Open-Source SSH-Snake Tool for Network Attacks

SSH-Snake, a self-modifying worm that leverages SSH credentials.

Original Article : The Hacker News

A recently open-sourced network mapping tool called SSH-Snake has been repurposed by threat actors to conduct malicious activities.

“SSH-Snake is a self-modifying worm that leverages SSH credentials discovered on a compromised system to start spreading itself throughout the network,” Sysdig researcher Miguel Hernández said.

“The worm automatically searches through known credential locations and shell history files to determine its next move.”

SSH-Snake was first released on GitHub in early January 2024, and is described by its developer as a “powerful tool” to carry out automatic network traversal using SSH private keys discovered on systems.

In doing so, it creates a comprehensive map of a network and its dependencies, helping determine the extent to which a network can be compromised using SSH and SSH private keys starting from a particular host. It also supports resolution of domains which have multiple IPv4 addresses.

“It’s completely self-replicating and self-propagating – and completely fileless,” according to the project’s description. “In many ways, SSH-Snake is actually a worm: It replicates itself and spreads itself from one system to another as far as it can.”

BotNet CNC Control Hacker Inflitration Exploits Vulnerabilities SSH TCP Bots Hardware Software Exploited

BotNet CNC Control Hacker Infiltrates & Exploits Vulnerabilities Vie SSH TCP Both Hardware Software Exploited

Sysdig said the shell script not only facilitates lateral movement, but also provides additional stealth and flexibility than other typical SSH worms.

The cloud security company said it observed threat actors deploying SSH-Snake in real-world attacks to harvest credentials, the IP addresses of the targets, and the bash command history following the discovery of a command-and-control (C2) server hosting the data.

How Does It Work?

These attacks involve active exploitation of known security vulnerabilities in Apache ActiveMQ and Atlassian Confluence instances in order to gain initial access and deploy SSH-Snake.
“The usage of SSH keys is a recommended practice that SSH-Snake tries to take advantage of in order to spread,” Hernández said. “It is smarter and more reliable which will allow threat actors to reach farther into a network once they gain a foothold.”

When reached for comment, Joshua Rogers, the developer of SSH-Snake, told The Hacker News that the tool offers legitimate system owners a way to identify weaknesses in their infrastructure before attackers do, urging companies to use SSH-Snake to “discover the attack paths that exist – and fix them.”

“It seems to be commonly believed that cyber terrorism ‘just happens’ all of a sudden to systems, which solely requires a reactive approach to security,” Rogers said. “Instead, in my experience, systems should be designed and maintained with comprehensive security measures.”

Netcat file transfer chat utility send receive files

Netcat file transfer chat utility. Easily Send & Receive Files Local & Remote.

“If a cyber terrorist is able to run SSH-Snake on your infrastructure and access thousands of servers, focus should be put on the people that are in charge of the infrastructure, with a goal of revitalizing the infrastructure such that the compromise of a single host can’t be replicated across thousands of others.”

Rogers also called attention to the “negligent operations” by companies that design and implement insecure infrastructure, which can be easily taken over by a simple shell script.

“If systems were designed and maintained in a sane manner and system owners/companies actually cared about security, the fallout from such a script being executed would be minimized – as well as if the actions taken by SSH-Snake were manually performed by an attacker,” Rogers added.

“Instead of reading privacy policies and performing data entry, security teams of companies worried about this type of script taking over their entire infrastructure should be performing total re-architecture of their systems by trained security specialists – not those that created the architecture in the first place.”

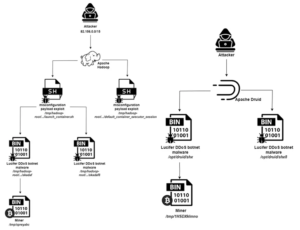
The disclosure comes as Aqua uncovered a new botnet campaign named Lucifer that exploits misconfigurations and existing flaws in Apache Hadoop and Apache Druid to corral them into a network for mining cryptocurrency and staging distributed denial-of-service (DDoS) attacks.

The hybrid cryptojacking malware was first documented by Palo Alto Networks Unit 42 in June 2020, calling attention to its ability to exploit known security flaws to compromise Windows endpoints.
As many as 3,000 distinct attacks aimed at the Apache big data stack have been detected over the past month, the cloud security firm said. This also comprises those that single out susceptible Apache Flink instances to deploy miners and rootkits.

“The attacker implements the attack by exploiting existing misconfigurations and vulnerabilities in those services,” security researcher Nitzan Yaakov said.

Apache Vulnerability Update Available!

Apache Vulnerability Update Available!

“Apache open-source solutions are widely used by many users and contributors. Attackers may view this extensive use as an opportunity to have inexhaustible resources for implementing their attacks on them.”

Seaverns Web Development Coding Security Applications and Software Development Bex Severus Galleries Digital Art & Photography

Quick Nmap – Host Scanning With Nmap Made Easy

Quick Nmap Scanning Utility Framework

This script provides a basic framework for a quick and easy Nmap scanning utility. Designed for rapid security checkups, it leverages the Zenity tool to create a graphical user interface (GUI) that simplifies the process of running common Nmap scans. This script does not require sudo privileges, making it suitable for environments where elevated permissions are restricted. However, it does have a minor bug that affects user interaction with the script descriptions.

  • Options Array: Defines a list of common Nmap scan options, each associated with a descriptive label.
  • Zenity Dialogs:
    • The zenity --list command presents a GUI list for selecting Nmap options.
    • The zenity --entry command prompts the user to input a URL.
  • Command Execution:
    • Constructs the full Nmap command using the selected options and entered URL.
    • Uses eval to execute the constructed Nmap command.
    • Displays the command being executed using another Zenity dialog.

The Code:


#!/bin/bash
# Quick Nmap - K0NxT3D
# Here's The Framework For A Project I Put
# Together For Quick Response Security Checkups.
# BUGS: Clicking The Description Will Process As Command.
# Click The Actual Command In This Example & Then The URL.

# Function to display error message and exit
    show_error() {
    zenity --error --text="$1" --title="Error"
    exit 1
}

# Function to display Nmap options list and prompt for URL
    get_nmap_options() {
# List of Nmap options
    options=(
    "[Ping Remote Host]" " -p 22,113,139" \
    "[Quick scan]" " -F" \
    "[Intense scan, all TCP ports]" " -p 1-65535 -T4 -A -v" \
    "[Scan all TCP ports (SYN scan)]" " -p- -sS -T4 -A -v" \
    "[Scan UDP ports]" " -sU -p 1-65535" \
    "[Full Scan, OS Detection, Version]" " -A" \
    "[Scan All Ports On Host]" " -sT -n -p-" \
    "[Scan with default NSE Scripts]:" " -sC" \
    "[TCP SYN port scan]" " -sS" \
    "[UDP Port Scan]" " -sU" \
    "[Scan For HTTP Vulnerabilities]" " -Pn -sV -p80 --script=vulners" \
    "[Nmap Help]" " -h")

# Display list of options and prompt for selection
    selected_option=$(zenity --list --title="Quick Nmap - K0NxT3D" --column="Options" "${options[@]}" --height 500 --width 500 --text="Select Options:")
        [ -z "$selected_option" ] && show_error "No Option Selected."

# Prompt for URL
    url=$(zenity --entry --title="Enter URL" --text="Enter URL To Scan:")
        [ -z "$url" ] && show_error "URL Not Provided."

# Execute Nmap command
    nmap_command="nmap $selected_option $url"
    echo "Executing Command: $nmap_command"
    zenity --info --text="Executing Nmap command:\n$nmap_command"
    eval "$nmap_command"
}

# Display GUI for Nmap options and URL input
get_nmap_options

Bug Description

  • Description Bug: The script’s current implementation has a bug where clicking on a description in the Zenity list triggers an attempt to run the description as a command first. This results in an error message being displayed before the actual Nmap command is executed. While this does not significantly affect the performance or functionality of the script, it is noted as a minor inconvenience.

Advanced Usage

  • Enhanced Functionality: Users who are familiar with Nmap can modify and extend this framework to include additional scanning options or integrate more advanced features.
  • Proxy and Anonymity: The script is compatible with tools like torsocks and proxychains for executing Nmap scans through proxies, enhancing privacy and bypassing geographical restrictions.

This script serves as a convenient starting point for running common Nmap scans with a user-friendly interface, while also allowing for customization and enhancement based on individual needs.

Seaverns Web Development Coding Security Applications and Software Development Bex Severus Galleries Digital Art & Photography

Apache Security Update Jammy Apache2 Php Linux Ubuntu/Raspberry Pi x64 | x32 RPI 3 – 4

Apache Security Update Jammy Apache2 Php Linux Ubuntu/Raspberry Pi x64 | x32 RPI 3 – 4

I certainly get a lot of attacks and nothing is ever really “Secure”.
That being said, there are some serious vulnerabilities running around, you might want to do some updating to your Apache Servers and Php.
After a recent batch of installs, I was able to exploit both Apache2 and Php pretty easily, so this will be common.

To test for the recent list of vulnerabilities and open exploits on Your Own Machines, you can run:

nmap -Pn -sV -p80 --script=vulners -oN output.txt 127.0.0.1

If you’re running several hosts:
nmap -Pn -sV -p80 –script=vulners -oN output.txt 192.168.1.0/24
This will scan your local network for any vulnerable hosts and sure enough, the new upgrades had some issues.

The Fix:

Linux Ubuntu (x64):

sudo add-apt-repository ppa:ondrej/apache2
sudo add-apt-repository ppa:ondrej/php

sudo apt update -y
sudo apt upgrade -y

This will work in just about every case – Except with the RPI3 Series.
This one’s a little longer, but it works and you can thank me later.

RPI 3B+ (x32/Jammy)

sudo apt-get install software-properties-common

Just In Case..

Apply Fix:

curl https://packages.sury.org/php/apt.gpg | sudo tee /usr/share/keyrings/suryphp-archive-keyring.gpg >/dev/null

echo "deb [signed-by=/usr/share/keyrings/suryphp-archive-keyring.gpg] https://packages.sury.org/php/ $(lsb_release -cs) main" | sudo tee /etc/apt/sources.list.d/sury-php.list

curl https://packages.sury.org/apache2/apt.gpg | sudo tee /usr/share/keyrings/suryapache2-archive-keyring.gpg >/dev/null

echo "deb [signed-by=/usr/share/keyrings/suryapache2-archive-keyring.gpg] https://packages.sury.org/apache2/ $(lsb_release -cs) main" | sudo tee /etc/apt/sources.list.d/sury-apache2.list

sudo apt update -y
sudo apt upgrade -y

sudo systemctl restart apache2

Resources:
Sury.ORG (Highly Recommended)
https://sury.org/

NMap: (Do You Even Web?)
https://nmap.org/


Bionic Backdrop Digital Video Screen Media

Bionic Backdrop

Bionic Backdrop Digital Video Screen Media – Events, Rock Shows, DJ, Performances of Any Kind.
New Features Include A Hidden Drop Down Menu
(Mouse Over or Tap In The Top Black Header)
With Casting Support from Desktop or Mobile.
Tested on Chromium (Solid) and Firefox(Not Recommended)
Lyrics Library is active and still Beta (Opens in new window).
Binary Output is Currently Disabled (Beta Only)

Bionic Home Page

DSX "Pure SEO" Content Management System

DSX DS7-1.2.5 Content Management System

DSX Version 7-1.2.5 (DS7) “Pure SEO” Content Management System. (Release Update V7-1.2.5)

While this CMS is considered “Black Hat”, it is what it is and it works.
Search Engines have priorities in what ranks and what doesn’t rank and
the single most important things anyone who wants the Top Ten knows are,
that your pages have to load fast, your content has to be abundant, thick and most
of all Hypertext Links.

DSX Delivers on all aspects of Fast Ranking “Pure SEO” tactics that I’ve developed
over the last 20+ years as a Professional SEO Expert and I stand behind my work.
I’m offering DSX 7-1.2.5 at a Very affordable price because it’s very small at this
point and that makes it relatively easy for you to make more of it or if you’re patient,
wait for the next version with far more features.

Installation & Troubleshooting.
View Demo
PhP Header Request Spoofing Ip Address User Agent Geo-Location

Generate Random HTTP Request

Random HTTP Request Generator – “generator.php”

This generates the Header Request Information to be sent to a Destination URL.
For Testing Purposes Only – Some Files Have Been Excluded.
The Destination URL tracks incoming HTTP Requests and filters them for “bad data” or
“Spoofed Requests” such as the requests generated here.