Seaverns Web Development Coding Security Applications and Software Development Bex Severus Galleries Digital Art & Photography

FreeDDNS – A Dynamic DNS Solution for Everyone

FreeDDNS: A Dynamic DNS Solution for Everyone

Dynamic DNS (DDNS) is a service that automatically updates the IP address associated with a domain name when the IP address changes. This is particularly useful for devices with dynamic IP addresses, such as home routers or servers, where the IP address is not static and can change frequently. Without DDNS, accessing these devices remotely would require manually updating the IP address each time it changes, which is impractical.

What is FreeDDNS?
FreeDDNS is a cost-effective, self-hosted Dynamic DNS solution designed to provide users with a reliable way to map a domain name to a dynamic IP address without relying on third-party services. Unlike traditional DDNS services that often come with subscription fees or limitations, FreeDDNS empowers users to create their own DDNS system using simple PHP scripts and a web server.

How FreeDDNS Works
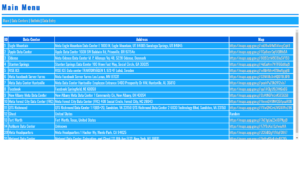
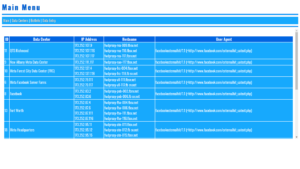
The FreeDDNS project consists of three core scripts:

  1. fddns.php: This script runs on the local machine and sends periodic requests to a remote server. It includes the local machine’s hostname in the request, allowing the remote server to identify and log the client’s IP address.
  2. access.php: This script runs on the remote server and logs the client’s IP address and hostname. It ensures that the latest IP address is always recorded in a log file (fddns.log).
  3. index.php: This script fetches the logged IP address and hostname from fddns.log and uses it to retrieve and display web content from the client’s machine.

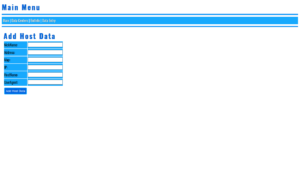
The process is simple:

  • The local machine sends its hostname and IP address to the remote server.
  • The remote server logs this information.
  • When accessed, the remote server uses the logged IP address to fetch content from the local machine, effectively creating a dynamic link between the domain name and the changing IP address.

Why Use FreeDDNS?

  1. Cost-Effective: FreeDDNS eliminates the need for paid DDNS services, saving you money.
  2. Customizable: Since it’s self-hosted, you have full control over the system and can tailor it to your needs.
  3. Reliable: By using simple PHP scripts and a web server, FreeDDNS ensures a lightweight and efficient solution.
  4. Easy to Implement: The scripts are straightforward and can be set up in minutes, even by users with minimal technical expertise.

FreeDDNS is the perfect solution for anyone looking to access their home network, personal server, or IoT devices remotely without the hassle of manual IP updates or expensive subscriptions. Whether you’re a tech enthusiast, a small business owner, or a hobbyist, FreeDDNS offers a reliable, customizable, and cost-effective way to stay connected. Take control of your dynamic IP challenges today with FreeDDNS—your gateway to seamless remote access.

FreeDDNS (Beta) 1.9kb
Download

Seaverns Web Development Coding Security Applications and Software Development Bex Severus Galleries Digital Art & Photography

Apache LAMP Install Script

Apache LAMP Install Script

Here’s a full Apache LAMP Install Script for setting up aa LAMP stack on Ubuntu (assuming Linux is excluded from the setup), including the installation and configuration of Apache, PHP, MySQL, and phpMyAdmin. The script also includes basic Apache configurations, enabling modules like mod_rewrite, and configuring phpMyAdmin with secure settings.

Full Apache LAMP Install Script
(for Ubuntu-based systems):


#!/bin/bash

# Update and upgrade the system
sudo apt update -y
sudo apt upgrade -y

# Add PPA for PHP and Apache
echo "Adding PPA repositories for PHP and Apache..."
sudo add-apt-repository ppa:ondrej/php -y
sudo add-apt-repository ppa:ondrej/apache2 -y
sudo apt update -y

# Install Apache2
echo "Installing Apache2..."
sudo apt install apache2 -y

# Install PHP and commonly used extensions
echo "Installing PHP and extensions..."
sudo apt install php libapache2-mod-php php-cli php-mysql php-curl php-gd php-xml php-mbstring php-zip php-soap -y

# Install MySQL Server and secure the installation
echo "Installing MySQL Server..."
sudo apt install mysql-server -y

# Run MySQL Secure Installation
echo "Securing MySQL installation..."
sudo mysql_secure_installation

# Install phpMyAdmin
echo "Installing phpMyAdmin..."
sudo apt install phpmyadmin php-mbstring php-zip php-gd php-json php-curl -y

# Link phpMyAdmin to Apache web directory
echo "Configuring phpMyAdmin..."
sudo ln -s /usr/share/phpmyadmin /var/www/html/phpmyadmin

# Set permissions for phpMyAdmin
echo "Setting permissions for phpMyAdmin..."
sudo chown -R www-data:www-data /usr/share/phpmyadmin
sudo chmod -R 755 /usr/share/phpmyadmin

# Enable Apache modules
echo "Enabling Apache modules..."
sudo a2enmod rewrite
sudo a2enmod headers
sudo a2enmod ssl

# Set up basic Apache configurations (security headers, etc.)
echo "Configuring Apache settings..."
echo '
<IfModule mod_headers.c>
Header always set X-Content-Type-Options "nosniff"
Header always set X-XSS-Protection "1; mode=block"
Header always set X-Frame-Options "SAMEORIGIN"
Header always set Referrer-Policy "no-referrer"
</IfModule>

<IfModule mod_rewrite.c>
RewriteEngine On
RewriteCond %{REQUEST_FILENAME} !-f
RewriteCond %{REQUEST_FILENAME} !-d
RewriteRule ^(.+)$ /index.php [QSA,L]
</IfModule>
' | sudo tee /etc/apache2/conf-available/security_headers.conf > /dev/null

# Enable custom security headers configuration
sudo a2enconf security_headers

# Enable and restart Apache and MySQL services
echo "Restarting Apache and MySQL..."
sudo systemctl restart apache2
sudo systemctl restart mysql

# Set MySQL to start on boot
echo "Ensuring MySQL starts on boot..."
sudo systemctl enable mysql

# Test Apache and MySQL installation
echo "Testing Apache and MySQL..."
sudo systemctl status apache2
sudo systemctl status mysql

# Configure phpMyAdmin with MySQL (Optional, run if needed)
echo "Configuring phpMyAdmin to work with MySQL..."
# Create a user for phpMyAdmin in MySQL
sudo mysql -u root -p -e "CREATE USER 'phpmyadmin'@'localhost' IDENTIFIED BY 'phpmyadminpassword';"
sudo mysql -u root -p -e "GRANT ALL PRIVILEGES ON *.* TO 'phpmyadmin'@'localhost' WITH GRANT OPTION; FLUSH PRIVILEGES;"

echo "LAMP stack installation complete!"


Breakdown of the Apache LAMP Install Script:

  1. System Updates:
    • Updates the package list and upgrades the system to ensure it is up-to-date.
  2. PPA for PHP and Apache:
    • Adds the PPA repositories for the latest PHP and Apache versions (ppa:ondrej/php and ppa:ondrej/apache2).
  3. Apache2 Installation:
    • Installs the Apache web server.
  4. PHP Installation:
    • Installs PHP along with some common PHP extensions (like MySQL, CURL, GD, MBString, XML, and SOAP).
  5. MySQL Installation and Security Setup:
    • Installs MySQL and runs the mysql_secure_installation script to secure the MySQL installation (you’ll need to set a root password and answer security questions).
  6. phpMyAdmin Installation:
    • Installs phpMyAdmin and relevant PHP extensions. It then configures it to be accessible via the Apache web server.
  7. Enabling Apache Modules:
    • Enables the mod_rewrite, mod_headers, and mod_ssl modules for security and functionality.
  8. Apache Basic Configuration:
    • Sets up HTTP security headers and enables the mod_rewrite rule to handle URL rewriting in Apache.
  9. Restart Services:
    • Restarts Apache and MySQL services to apply changes.
  10. Test:
    • Verifies that Apache and MySQL services are running properly.
  11. MySQL User for phpMyAdmin (Optional):
    • Creates a user for phpMyAdmin in MySQL with the necessary privileges. You can customize the password and user details.

Additional Notes:

  • MySQL Secure Installation: This script will invoke the mysql_secure_installation command during execution. You will be prompted to configure your MySQL root password and set other security options interactively.
  • phpMyAdmin: By default, phpMyAdmin will be accessible at http://your-server-ip/phpmyadmin after running this script. Make sure to adjust any security settings (e.g., .htaccess protection) for production environments.
  • Permissions: The script ensures that phpMyAdmin has proper file permissions to function correctly under the web server’s user (www-data).
Kandi Web Crawler PHP Web Scraping Scripts Seaverns Web Development Coding Security Applications and Software Development Bex Severus Galleries Digital Art & Photography

PHP Web Scraping Scripts

PHP Web Scraping Scripts:

Extracting Vast Data Types Efficiently

In today’s digital world, PHP web scraping scripts have become a powerful tool for extracting and organizing data from websites. PHP, known for its versatility and ease of use, allows developers to build efficient web scraping solutions that can handle a vast array of data types. Whether you’re looking to scrape text, images, videos, or product details, PHP-based scrapers can handle the task.

Diverse Data Types in Web Scraping

With PHP web scraping scripts, you can scrape various types of data, including:

  • Text: Collect articles, blog posts, reviews, and product descriptions.
  • Images and Videos: Extract visual content like photos, memes, icons, and embedded videos.
  • Structured Data: Gather tables, charts, and metadata such as HTML tags, JSON, and XML.
  • E-commerce Data: Scrape prices, product details, stock availability, and customer reviews from online stores.

This makes PHP a go-to choice for developers looking to extract a wide range of data types efficiently.

Current Technologies and Trends in PHP Web Scraping

Modern PHP web scraping scripts use libraries like cURL and Goutte for HTTP requests and DOMDocument or XPath for navigating HTML structures. In addition, headless browsers like Puppeteer and PhantomJS are being used in conjunction with PHP to render JavaScript-heavy websites, allowing for more comprehensive scraping of dynamic content.

Another trend is the rise of AI-enhanced scrapers, where machine learning algorithms are integrated to improve data accuracy and reduce errors. With the increasing need for automation and big data processing, PHP web scraping is evolving rapidly, offering solutions that are scalable and adaptable.

Harness the power of PHP web scraping to tap into the vast world of online data, and stay ahead in this ever-growing digital landscape.

Download The Latest Free Version Of Kandi Web Scraper Here.

More About Kandi Web Scraper Here

Senya 1.0 Cross Domain WordPress Data Mining Utility

Сеня 1.0 (Senya 1.0)

Senya 1.0 Cross Domain WordPress Data Mining Utility

Сеня 1.0 – K0NxT3D 2024
Back End WordPress Utility

Features:

  • Edit WordPress Database.
  • Edit WordPress User Tables.
  • Edit WordPress User Information.
  • Display WordPress Domain and Associated Admin Email Addresses Across Multiple Domains.

A simple and easy to use PHP/HTML Based MySQL Back End Connection Utility with Editing Capabilities and Email Harvesting across Multiple Domains.

Download

Facebook Data Centers Project

I collect a lot of data and data mining is just one of those things that I enjoy.
I build Web Crawlers and Web Scrapers often, but I really love tracking other
bots, some of which I’ve “known” for decades now.

With the ever expanding Facebook Empire, I’ve been catching a lot of the
hits from FacebookExternalHit,
[ facebookexternalhit/1.1 (+http://www.facebook.com/externalhit_uatext.php) ]
and while Facebook it’self is being overrun by nefarious bots and hacked accounts,
their problem is my solution.

The majority of the hits from FacebookExternalHit have preceded an attack, which tells me several things.
1: Facebook For Developers has given nefarious actors an edge on the Facebook user and I won’t go into detail on that, but I can make better informed security decisions based on what can be done from that side of the platform.

2: I can test my security software on both Facebook and my websites by simply posting a link to Facebook and this is really handy in my line of work. I get to see which Data Center the bot is coming from (GeoLocation), how many bots that particular Data Center has (Interesting Data There) and how fast the reaction time is, which helps determine the software being used and in which manner it’s being used.

3: Most Importantly, it gives me reasons to build new software.

So, I built this database for such purpose as to collect more data on the situation and there’s some interesting patterns developing. While it’s not exactly something I feel the urge to release, it’s worth sharing.

FBDC uses Php and MySQL, a pretty simple database and small file sizes (I like small files).
The User Input Form Works.. Ikr, a form that works??
It has a few things left to work out on the user input; I’m a big fan of getting my hands dirty,
so Updating the Data Center / BotInfo is being done via phpmyadmin until I build a better form.
Here’s a few screenshots:

FBDC - Facebook Data Centers and FacebookExternalHit Bot Collected Data

FBDC – Facebook Data Centers and FacebookExternalHit Bot Collected Data – Main Menu


FBDC - Facebook Data Centers and FacebookExternalHit Bot Collected Data

FBDC – Facebook Data Centers and FacebookExternalHit Bot Collected Data – Data Center List


FBDC - Facebook Data Centers and FacebookExternalHit Bot Collected Data

FBDC – Facebook Data Centers and FacebookExternalHit Bot Collected Data – BotInfo List


FBDC - Facebook Data Centers and FacebookExternalHit Bot Collected Data

FBDC – Facebook Data Centers and FacebookExternalHit Bot Collected Data – User Input Form


FBDC - Facebook Data Centers and FacebookExternalHit Bot Collected Data

FBDC – Facebook Data Centers and FacebookExternalHit Bot Collected Data – Because There HAS to be a Hacker Theme too.

DSX "Pure SEO" Content Management System

DSX DS7-1.2.5 Content Management System

DSX Version 7-1.2.5 (DS7) “Pure SEO” Content Management System. (Release Update V7-1.2.5)

While this CMS is considered “Black Hat”, it is what it is and it works.
Search Engines have priorities in what ranks and what doesn’t rank and
the single most important things anyone who wants the Top Ten knows are,
that your pages have to load fast, your content has to be abundant, thick and most
of all Hypertext Links.

DSX Delivers on all aspects of Fast Ranking “Pure SEO” tactics that I’ve developed
over the last 20+ years as a Professional SEO Expert and I stand behind my work.
I’m offering DSX 7-1.2.5 at a Very affordable price because it’s very small at this
point and that makes it relatively easy for you to make more of it or if you’re patient,
wait for the next version with far more features.

Installation & Troubleshooting.
View Demo
https://wordpress.org/download/

DarkMatter Display Random Quotes Plugin For WordPress

The DarkMatter Display Random Quotes Plugin For WordPress is a very simple and straight forward plugin that posts random quotes to the bottom of WordPress Posts.
You can edit the quotes.txt (plugins/quote-of-the-day/quotes.txt) file to add or remove your own.
You can see it running below this post.

Download: DarkMatter – Quote Of The Day WordPress Plugin

PhP Header Request Spoofing Ip Address User Agent Geo-Location

Generate Random HTTP Request

Random HTTP Request Generator – “generator.php”

This generates the Header Request Information to be sent to a Destination URL.
For Testing Purposes Only – Some Files Have Been Excluded.
The Destination URL tracks incoming HTTP Requests and filters them for “bad data” or
“Spoofed Requests” such as the requests generated here.

Server Status Monitor PhP Code

PhP Monitor Active and Inactive Servers

This is a simple and no frills way to monitor your servers.
You will need to create the file “urls.txt” in the same folder as the “active-servers.php” file.

Examples – urls.txt:
https://www.my-website.com/
http://localhost/
http://www.my-website.com/some/page.php

Navigate to the active-servers.php file. ( http://www.your-site.com/scripts/active-servers.php)
Online Servers will be Lime and Offline Servers, Red.

active-servers.php

<head>
<title>Active Servers</title>
</head>
<body style=”background-color: #0c0c0c;”>
<div>
<table width=”100%” height=”100%”>
<tr>
<td>
<table style=”margin-bottom: 100%;text-transform: uppercase;”>
<?php
$fn = fopen(“urls.txt”,”r”);
while(! feof($fn)) {
$result = fgets($fn);
$server=gethostbyname(parse_url($result, PHP_URL_HOST));
if (fsockopen($server, 80)){
echo (‘ <tr><td><b><a style=”color: Lime; text-decoration: none;”href=”‘.$result.'” target=”viewer”>’.$result.'</b></td></tr>’. “\r\n”);
} else
{
echo (‘ <tr><td style=”color: #a00000″>’.$result.'</td></tr>’. “\r\n”);
}

} fclose($fn); ?>

</table>
</td>
<td width=”100%”><iframe align=”right” class=”viewpanel” src=”” name=”viewer” frameborder=”0″ width=”100%” height=”600px”></iframe></td>
</tr>
</table>
</div>
</body>

Spoofing Random Toys MySql WordPress Form Data Fields

Fake Email Generator Create Random Email Addresses From Files

This is just a fun little toy that happened while working on MySQL Automation.
The files used are first_names.txt, last_names.txt and domains.txt.
Reading random lines from the files in order creates the “Fake Email Address” and using [array_rand($variable)]; each email address is somewhat unique as I’m only using 80,000 names (give or take a few hundred).

All Files: fake-email-generator.zip


#!/bin/bash
$first_names = 'first_names.txt';
$last_names = 'last_names.txt';
$dom = 'domains.txt';

    $firstname = file($first_names);
    $fdata = $firstname[array_rand($firstname)];
    $first = $fdata;

        $lastname = file($last_names);
        $ldata = $lastname[array_rand($lastname)];
        $last = $ldata;

    $comd = file($dom);
    $edata = $comd[array_rand($comd)];
    $com = $edata;

        $first = preg_replace('/\s+/', '', $first);
        $first = strtolower($first);
        $last = preg_replace('/\s+/', '', $last);
        $last = strtolower($last);
        $com = preg_replace('/\s+/', '', $com);

    echo $first."@".$last.$com;]