Contacts Database and Forms Template
Mastering Contact Management with Flask: A Guide to the Contacts Database and Forms Template
Contacts Database and Forms Template
Author: K0NxT3D
In this guide, we will explore a practical and effective Flask template that allows beginner to intermediate Python developers to manage contact information easily. The Contacts Database and Forms Template is designed to simplify the process of building a database-driven application using Flask, SQLite, and SQLAlchemy. Whether you are new to Flask or looking to streamline your existing projects, this template is an excellent starting point for your next app.
Introduction to Flask and SQLAlchemy
Flask is a lightweight Python web framework that helps developers build web applications quickly with minimal effort. SQLAlchemy is an ORM (Object-Relational Mapping) tool for Python, which allows developers to interact with databases using Python objects instead of raw SQL queries. In this template, we leverage Flask and SQLAlchemy to create a simple but powerful Contact Management System.
Key Features of the Contacts Database and Forms Template
- Flask-based Web Application: Built with Flask, this template offers an easy-to-understand, scalable foundation for building dynamic web applications.
- SQLite Integration: By default, this template uses SQLite, a lightweight database engine, perfect for development and small projects.
- Forms for Data Entry: The application provides forms for adding, viewing, and editing contact information, making it highly user-friendly.
- Internal and External File Management: Organize static files such as images and JavaScript files to keep your app structure neat.
Core Concepts and Structure of the Template
The application consists of several components that make it functional and user-friendly:
- Flask Setup and Configuration: The app is configured to run on port 32034 by default. The database connection is established using SQLite, ensuring that data can be stored locally in a file named
default.db. - The Contact Information Model: The core of this application is the
ContactInfomodel, defined using SQLAlchemy. This model includes fields for:- Name
- Address
- City
- State
- Zip Code
- Phone
- Database Operations: Using SQLAlchemy, this template performs basic CRUD operations:
- Create: Users can add new contacts through a form.
- Read: Contacts are displayed in a dropdown for viewing or editing.
- Update: Contact information can be updated with new details.
- User Interface with Jinja Templates: The HTML content is dynamically generated using Jinja, Flask’s templating engine. This enables the app to display content such as contact details, forms, and menus based on user input.
Step-by-Step Walkthrough
1. Running the Application
The application starts by opening a browser window pointing to http://127.0.0.1:32034, allowing users to interact with the interface directly. It offers three main actions:
- Enter Contact Information: A form to add new contact details.
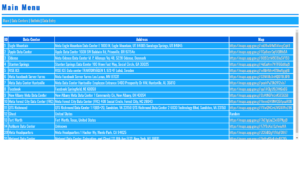
- View Contact Information: A dropdown menu to select a contact and view their details.
- Edit Contact Information: Allows users to select and modify existing contact information.
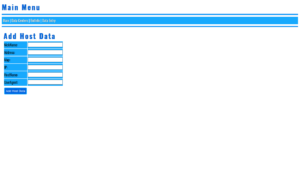
2. Adding Contacts
The add_contacts route enables users to input their contact details through a user-friendly form. Upon submitting the form, the data is saved to the database, and the user is redirected to a success page that displays the entered information.
Example form fields include:
- Full Name
- Address
- City
- State
- Zip Code
- Phone
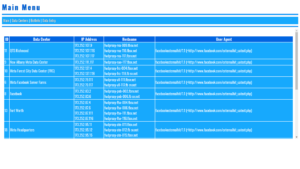
3. Viewing Contacts
The view_contacts route allows users to select a contact from a dropdown menu and view their details. When a contact is selected, their information is displayed in a neat format, and clickable links are provided for phone numbers and email addresses.
4. Editing Contacts
The edit_contacts route allows users to update the details of an existing contact. The user selects a contact, modifies the information, and submits the updated details. The changes are then saved back to the database.
5. Exiting the Application
For developers testing or experimenting with this application, the exit_app route provides an option to shut down the Flask application gracefully with a delayed redirect.
Advantages for Python Beginners and Intermediate Developers
- Beginner-Friendly: The template is simple enough for newcomers to Flask and Python to understand and build upon. It comes with detailed comments explaining each step of the process.
- Database Integration Made Easy: The integration of SQLite and SQLAlchemy allows you to get started with databases without the complexity of more advanced systems like PostgreSQL or MySQL.
- Extensibility: The structure is flexible, enabling you to add more functionality like user authentication, advanced search features, or exporting contact data to CSV or Excel formats.
How to Customize and Extend the Template
As a beginner or intermediate Python developer, you might want to extend this template to suit your specific needs. Here are a few ideas for customization:
- User Authentication: Integrate Flask-Login or Flask-Security to manage user accounts and restrict access to the contact management features.
- Enhanced Search Functionality: Add search features to allow users to filter contacts based on certain criteria (e.g., by name, city, or email).
- Exporting Data: Implement features to export the contact data into formats like CSV or Excel, allowing users to back up or share their contact lists.
Contacts Database and Forms Template – Included Files:
- app.py
- requirements.txt (For Python Module Dependencies)
- base.html (HTML Template File)
- default.css
- Image Files
- genreq.py *
* Custom Python script which generates a requirements.txt if pip should be problematic.
More Here…
Contacts Database and Forms Template Download:
The Contacts Database and Forms Template is a perfect starting point for beginner to intermediate Python developers looking to build a simple Flask application with database integration. It demonstrates essential concepts like database models, form handling, and template rendering, providing a solid foundation for further development. Whether you’re learning Flask or building a contact management app, this template is a versatile tool for your Python projects.
Explore it, customize it, and make it your own—this template is just the beginning of your web development journey!